Featuring Paul Feeley's Asellus, 1964
Conceptual Basis
Composed of simple multi-hued forms, Paul Feeley’s symmetrical compositions are rhythmic and bold, possessing a crisp energy and vitality. The precise structure and lines of Feeley’s shapes and his smooth application of paint contrast with the organic, loose forms that fill his canvases. This lesson focuses of the various elements and principles of art found in Feeley’s works, including shape, color, space, and rhythm.
Paul Feeley
(American, 1910–1966)
Asellus, 1964
Oil-based enamel on canvas
101 x 101 inches (256.5 x 256.5 cm)
Collection Albright-Knox Art Gallery, Buffalo, New York
Bequest of Arthur B. Michael, by exchange, 2014
2014:18.2a-d
- Become familiar with the artist Paul Feeley.
- Enhance students’ comprehension of color theory through a focus on complementary colors.
- Explore figure-ground relationships in Feeley’s artwork.
- Increase awareness of organic shapes found in nature.
- Support the understanding of basic art elements and principles.
- Reinforce mathematic instruction through the use of rulers and the creation of a grid system.
- Create a painting or collage featuring organic shapes with an emphasis on a figure-ground relationship.
- Scissors
- Rulers
- Pencils
- Cardboard or thick paper to create a stencil (4.5 x 4.5 inches)
Additional Materials for Grades 1–4
- Glue
- Colored construction paper
- White construction paper cut into squares (5.5 x 5.5 inches)
- 12 x 12–inch sheet of construction paper
Additional Materials for Grades 5–8
- 10 x 10–inch thick painting paper
- Acrylic paint
- Paintbrushes
- 6 x 6–inch construction paper
About the Artist
Born in Iowa in 1910 and raised in California, Paul Feeley moved to New York in his twenties to pursue a career in art. Feeley trained at the Art Students League before serving in the Marines during World War II.
After the war’s end, Feeley began a career teaching art. It was during his tenure as a professor at Vermont’s Bennington College, from 1939 to 1966, that Feeley developed as an artist, in part through his formative friendships with fellow artists. During a twelve-year period, Feeley explored early Abstract Expressionist–inspired paintings, organic figure-ground compositions, and diagrammatical grid works.
About the Art
Asellus, 1964, is visually stimulating—simple, yet bold. The work’s color, size, and shape demand one’s attention. A butterfly-like shape in bright complementary blue and orange colors fills each depicted square. While the shapes are organic, the rigid, crisp application of the paint contrasts that gentler appearance. There is a sense of uniformity and structure to the work that reveals the rigor and preciseness of the artist. There is a playfulness inherent in the figure-ground relationship between the curved lines of the shapes and the work’s background. The variety of contrasts between the different elements of the work makes this painting a visual experience.
grid: a system of lines that cross to form a series of squares
organic shape: shape that appears to be found in nature
complementary colors: colors located directly across from each other on the color wheel; when used together, these colors appear vivid and bright
outline: a line that indicates the outer edge or shape of an object
symmetry: instance in which both sides of an object are the same, like a mirrored image
rhythm: uniformed movement in pattern
figure-ground relationship: the visual relationship between form and background; can also be referred to as positive and negative space
The forms in Paul Feeley’s works resemble organic shapes found in nature. When discussing organic shapes with students it can helpful to go outside to make first-hand observations of the different shapes that appear in nature. From leaves and flowers to nuts and rocks, students can find inspiration in the world around them. For younger students, create a scavenger hunt: Take your students outside and show them examples of Feeley’s work, then ask them to locate objects that resemble Feeley’s forms. This will encourage discussion and excitement about organic shapes. Cloud watching on a nice day could exercise the observational skills and awaken the imaginations of older students.
You can bring materials from nature back into the classroom in order to inspire students while they are creating their own organic shapes during the artmaking activity; this also introduces an element of science into your art lesson.
To begin the artmaking activity, students should brainstorm a list of organic shapes. Once they have chosen a shape to create, they should draw the shape on cardboard, then cut out the shape to create a stencil. Before they begin duplicating their shape, students should decide what complementary color set they will use in their artwork. You could have a refresher discussion about complementary colors before students begin creating their artwork.
Grades 1–4
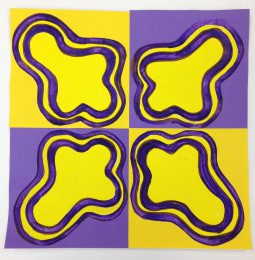
Students should trace their stencil four times on a single piece of construction paper in one of their complementary colors. (The size of the cardboard stencil will determine the scale of the students’ artwork.) They will then cut out their shapes.
Taking the original stencil, students should retrace their shape onto another piece of cardboard, only making the shape slightly larger by outlining it farther away from the original border. Once students have created their larger shape, they should cut it out and use it as another stencil. With another sheet of construction paper (the other complementary color), students should trace their larger stencil four times, then cut out the shapes.
With each smaller shape in the center of each larger shape, the students should glue their two shapes together. Students should now have four sets of complementary color shapes. Set the shapes aside when preparing the background of their final product.
Pass out four square pieces of white construction paper to students. Using rulers, demonstrate how students can find the centers of their squares by measuring the length and width of their squares. Students can lightly draw a small dot to mark the center of each square. This will guide students as to where they should place their organic shapes. Once students have measured, instruct them to glue their shapes into the centers the squares. To finish the project, glue the squares onto a 12 x 12–inch sheet of construction paper in a grid layout.
Grades 5–8
To prepare their painting paper, students should begin by drawing diagonal lines connecting opposite corners of their paper, creating a large “X” across the entire sheet. Students should then measure the length and width of their paper to find the center of each side, then, from these points, lightly draw vertical and horizontal lines to mark the center of their work. This will set up four smaller areas on the base of their grid with one diagonal line in each square. Students should draw an additional diagonal line in each box to create an “X” in each box. The “X” will serve as a guide when students are tracing their shapes onto their paper. Have students align their stencil in the middle of one box on their paper.
When tracing, instruct students to mark the spots on their stencil that hit any diagonal lines. This will enable students to align their stencil centrally in each box. Also instruct students to point their stencil toward the center of the paper before they begin tracing. Once students have drawn their shapes in each box, they can erase their horizontal, vertical, and small “X” lines, keeping the initial diagonal lines on their paper.
Students should begin painting the shapes on their paper using one of their chosen complementary colors. Remind students to evenly distribute their paint for a smooth application. Once students have painted the shapes, refer to Feeley’s use of outline in Assellus, 1964. Using the other complementary color, students should outline their shapes. With one outline done, students should take their original paint color and re-outline the shapes. This should be done once more with the second color.
For the remainder of the background, students have the option of painting the entire space one color or they can cut out their shapes, glue them onto different pieces of 6 x 6–inch construction paper, and glue the squares onto a new sheet of paper.
Lesson Tips:
-
When tracing shapes, it is helpful to instruct younger students to draw a light “X” in the middle of each traced shape. This side of the shape will contain pencil lines. The “X” can remind students that they do not want the pencil-lined side of their shape to show on their final product. You can remind students to apply their glue to the “X” side of each of their shapes.
-
This lesson can be tailored to focus on the organic shapes found in nature in relation to the seasons. You can make a science-based connection by using symbols of the seasons such as snowflakes for winter, acorns for fall, or rain drops for spring. By using these symbols as shapes, the artwork can be used to illustrate seasonal changes.
-
For an advanced lesson, try adding additional shapes to the grid areas.
- New York State Learning Standards for the Arts: 1, 2, and 3
- College and Career Readiness Anchor Standards for Writing: 1, 2, 5
- College and Career Readiness Anchor Standards for Speaking and Listening: 1, 4, 5, 6
- College and Career Readiness Anchor Standards for Language: 1, 2, 3, 6
- College and Career Readiness Anchor Standards for Reading: 1, 2, 5, 7, 10
- Core Standards for Mathematical Practice: 1-8